I received a call from FedEx late yesterday. They wanted to schedule a delivery from Warfield Electric for this coming Tuesday. The motor is on it's way home!
I'm astounded that the motor got back to Illinois, was repaired and will be back in my garage in 18 days. I'm not sure how NetGain and Warfield Electric pulled that off, but I'm ever so grateful to them that the have.
I should be able to get the motor back in the car by Wednesday, and then I can begin in earnest, the work of rebuilding the brackets and supports for the batteries.
Friday, May 28, 2010
Wednesday, May 26, 2010
What To Do, What To Do
I realize I haven't posted anything in a while, but that's because I haven't really done anything. I'm waiting for the motor to find it's way back here, and until it does, there isn't much to do.
However, there are a few things, and there's some news to share. A friend of mine responded to my requests for suggestions about where I might get some hard rubber for a new motor shim, or more specifically what I could use. He'd suggested using a piece of a tire from a lawn mower. I went to the hardware store and found a 14" hard rubber tire that looked like it would work perfectly. At only $14 and change, I decided to go for it.

I realize this my not be the most glamorous looking thing, but I think it's going to work out very nicely. At the bottom of the shot, you can see the piece I cut out of the tire. I cut the rubber off of the inside diameter exposing the inside of what was the hollow space in the tire. Once I press it flat, it's the perfect height to shim the motor, and it will provide some of springy support. The bulk of the motor's weight will still be supported by the original motor mounts that supported the original engine just like before.
I also spent some time making some cardboard cutouts of battery layouts. I simply placed the batteries on the card board in configurations I think will fit in the car, and cut them out. I want to fit the original 31 batteries that were up front, back in, but I want to get them all oriented so they are vertical, not prone like before. It's going to be a tight fit, but when has anything in this car not been? It's tough dealing with tight fits in millimeters, especially when you're only 5 millimeters short for what would other wise be a perfect fit.
I mentioned that there's some good news as well. One of the things that has surprised me, is the number of people that have contacted me to tell me how much they liked the car, or admire the work I've done. It's always great hearing from different people, and to hear their stories. I hate to be so bold as to think I might have influenced some people to undertake a conversion, but in the long run, I hope it does. Even with this little set back, it has been an incredible amount of fun.
Just last week I was contacted by someone who is writing a book of some sort about electric cars and conversions. He wants to include pictures of the EV Z3 as an example of an interesting conversion. Let's face it, there are plenty of Ford Rangers and Chevy S-10's that have been converted, and while they are interesting, they are no Z3 ;-) I'm in the process of getting some photos together for him. We'll see how many make it into the book. I'll be sure to keep you all informed.
On a slightly related note, I did receive one bad piece of news today. Now that I've finished the car (current issues aside), I'd really love to charge it with solar power. I called a local company that does solar PV systems so I could get a quote and find out where I stand. It looks like my home may not be a good candidate. My roof doesn't have a surface that faces South. It does have surfaces pointing East and West. Apparently in lieu of South, West is most desirable. Unfortunately, because of a bend in the street, mine is actually angled a bit toward the North. It would still work, but if it's too far North, it will greatly reduce the incentives paid by my local utility to help defray the costs. I'll know more when the representative can come out and actually measure the azimuth.
That's all for now. I've got a few more things I can do while waiting for the motor's return, so I'll be working on them as I can, and I'll post all the details.
However, there are a few things, and there's some news to share. A friend of mine responded to my requests for suggestions about where I might get some hard rubber for a new motor shim, or more specifically what I could use. He'd suggested using a piece of a tire from a lawn mower. I went to the hardware store and found a 14" hard rubber tire that looked like it would work perfectly. At only $14 and change, I decided to go for it.
I realize this my not be the most glamorous looking thing, but I think it's going to work out very nicely. At the bottom of the shot, you can see the piece I cut out of the tire. I cut the rubber off of the inside diameter exposing the inside of what was the hollow space in the tire. Once I press it flat, it's the perfect height to shim the motor, and it will provide some of springy support. The bulk of the motor's weight will still be supported by the original motor mounts that supported the original engine just like before.
I also spent some time making some cardboard cutouts of battery layouts. I simply placed the batteries on the card board in configurations I think will fit in the car, and cut them out. I want to fit the original 31 batteries that were up front, back in, but I want to get them all oriented so they are vertical, not prone like before. It's going to be a tight fit, but when has anything in this car not been? It's tough dealing with tight fits in millimeters, especially when you're only 5 millimeters short for what would other wise be a perfect fit.
I mentioned that there's some good news as well. One of the things that has surprised me, is the number of people that have contacted me to tell me how much they liked the car, or admire the work I've done. It's always great hearing from different people, and to hear their stories. I hate to be so bold as to think I might have influenced some people to undertake a conversion, but in the long run, I hope it does. Even with this little set back, it has been an incredible amount of fun.
Just last week I was contacted by someone who is writing a book of some sort about electric cars and conversions. He wants to include pictures of the EV Z3 as an example of an interesting conversion. Let's face it, there are plenty of Ford Rangers and Chevy S-10's that have been converted, and while they are interesting, they are no Z3 ;-) I'm in the process of getting some photos together for him. We'll see how many make it into the book. I'll be sure to keep you all informed.
On a slightly related note, I did receive one bad piece of news today. Now that I've finished the car (current issues aside), I'd really love to charge it with solar power. I called a local company that does solar PV systems so I could get a quote and find out where I stand. It looks like my home may not be a good candidate. My roof doesn't have a surface that faces South. It does have surfaces pointing East and West. Apparently in lieu of South, West is most desirable. Unfortunately, because of a bend in the street, mine is actually angled a bit toward the North. It would still work, but if it's too far North, it will greatly reduce the incentives paid by my local utility to help defray the costs. I'll know more when the representative can come out and actually measure the azimuth.
That's all for now. I've got a few more things I can do while waiting for the motor's return, so I'll be working on them as I can, and I'll post all the details.
Saturday, May 15, 2010
The WarP 11 Has Left the Building
Friday afternoon, the surliest Fed-Ex employee ever stopped by to pick up the motor. It only took 10 minutes to get the paper work sorted out and get the motor loaded on the truck.
It took me the better part of a day to pack it. I no longer had the original box and packing material that it was shipped in, so I had to fabricate one. I put in multiple layers of cardboard and foam on the bottom and sides, and made some sturdy cardboard wedges to hold it in place in the middle of the box. It's packed in very tight and shouldn't move around during shipping.
I'd wager that it's going to make it back to Illinois safe and sound. Unless, of course, it takes damage from just being in the presence of such an overwhelmingly bitter and hateful Fed-Ex delivery man.
Thursday, May 13, 2010
Soliciting Ideas
I finished packing the motor today and the pickup is being scheduled. Soon it will be on it's way back to Illinois for repair. Hopefully, it will be back home before too long.
After I took the motor out of the car, I got to looking at one of the brackets that I made. This bracket is simply in place to hold the motor the proper distance off of the sub-frame so that the drive-line lines up correctly. Here's a shot of the bracket:
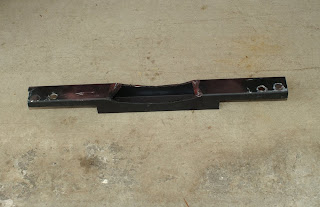 It may be ugly, but it works fine. Here's a shot of it in place:

You can see it resting there just on the top of the sub-frame. In fact, you can see that the holes in the bracket line up with the holes in the sub frame. What that allowed me to do was wrap a piece of steel around the motor and tie it down to the sub-frame so that it can't go anywhere. Now that is not the primary motor mount. There were brackets in place that tied the motor directly to the old motor mounts to prevent the motor from rotating under torque. The strap just held it down to the bracket.
Anyway, the reason I'm showing you this, is because when I took it all apart, I got to thinking that this particular support might be better as a piece of hard rubber, rather than steel. I'm just thinking that a certain amount of give, which would help cushion the motor from bumps and what not, might be better. I don't think this had anything to do with the motor's failure, but if I can make life for the motor any easier, why not.
When I say hard rubber, I'm thinking of something like the heel of a men's dress shoe. So my question to all of you is do you have any suggestions of where I might find a piece of hard rubber that's about 1" by 2" and roughly 12" long? Many of the things that have gone in the car I've used in a way that wasn't intended by the manufacturer. I've had to be creative. The trouble is, I just can't think of anything that has that type of rubber in the size I need. If you have a suggestion, post it in the comments. I'd be very appreciative.
After I took the motor out of the car, I got to looking at one of the brackets that I made. This bracket is simply in place to hold the motor the proper distance off of the sub-frame so that the drive-line lines up correctly. Here's a shot of the bracket:
 It may be ugly, but it works fine. Here's a shot of it in place:
You can see it resting there just on the top of the sub-frame. In fact, you can see that the holes in the bracket line up with the holes in the sub frame. What that allowed me to do was wrap a piece of steel around the motor and tie it down to the sub-frame so that it can't go anywhere. Now that is not the primary motor mount. There were brackets in place that tied the motor directly to the old motor mounts to prevent the motor from rotating under torque. The strap just held it down to the bracket.
Anyway, the reason I'm showing you this, is because when I took it all apart, I got to thinking that this particular support might be better as a piece of hard rubber, rather than steel. I'm just thinking that a certain amount of give, which would help cushion the motor from bumps and what not, might be better. I don't think this had anything to do with the motor's failure, but if I can make life for the motor any easier, why not.
When I say hard rubber, I'm thinking of something like the heel of a men's dress shoe. So my question to all of you is do you have any suggestions of where I might find a piece of hard rubber that's about 1" by 2" and roughly 12" long? Many of the things that have gone in the car I've used in a way that wasn't intended by the manufacturer. I've had to be creative. The trouble is, I just can't think of anything that has that type of rubber in the size I need. If you have a suggestion, post it in the comments. I'd be very appreciative.
Monday, May 10, 2010
News on the Motor
I got an answer from George at Netgain, as to what that stuff was that was laying in the bottom of the motor. Apparently all that debris is balancing putty. Well, that explains everything nicely! It totally makes sense now. Why the motor and clutch were balanced at first. Why it seemed to fall out of balance all at once.
Without a moments hesitation, Netgain has told me to prepare the motor for shipment, they're sending someone to pick it up to take it back for repairs. Now that's customer service!
It's sad to see it go, but I'm thrilled at the prospect of getting it back balanced, strong and ready to go back in the car.
Now onto some other improvements on the car while I await the return of the motor.
Friday, May 7, 2010
More Bad News
Fresh off of yesterdays relief that the balanced flywheel was back on comes this disappointment. I had mentioned that there was still a bit of vibration from the motor and that I wasn't going to worry about it. Well, that turned out to be more wishful thinking than anything, and profoundly wrong. It is definitely something to be concerned about.
While working on the motor I had dented the steel shroud I'd made for the forced air ventilation for the motor. I decided to take it off and fix it. When I did, look what fell out:
 I'm not entirely sure what that is (the dime is for scale, it wasn't in the motor). It's not metallic, or at least it's not magnetic. It looks like some sort of hard baked plastic. In either case, I'm pretty sure it's not supposed to be rattling around in the motor, in pieces.
For the most part, the motor is sealed. I have the shroud on one end that allows me to force air into the motor to cool it, and there is a 1/8" mesh screen on the other where the air comes out. There's no way for anything to get in there to cause damage. So it would seem that what ever that is, failed on it's own, and failed catastrophically. I guess that explains why I didn't start noticing any vibration for several weeks while I'd been using the car. The flywheel didn't just fall out of balance, the motor did.
I have an email in to the fine folks at Netgain. I'm sure they'll be able to tell me what's going on and help me get it fixed. One thing is certain, and that is the EV Z3 is not going to be back on the road for a while. I plan to use the down time to do some other improvements to the car, so stay tuned.
Thursday, May 6, 2010
Good News Everyone!
Well I bolted the flywheel up to the motor and spun it up. What a difference! The wobble was almost entirely gone. There is still a small vibration at around 500 rpm while the motor spins up, but when the RPM's climb just a little higher and beyond, it is as smooth as glass.
Now I just need to get the pressure plate mounted back up and start re-assembling the drive train. Mounting the pressure plate is going to be tricky as it is naturally sprung to push on the clutch disk, meaning I have to collapse it about 1/2" to get it on. When it's new it has a retaining system that holds it until you bolt it up, making it easy to get it on the flywheel. Well, that's gone so this could be tough.
Now I just need to get the pressure plate mounted back up and start re-assembling the drive train. Mounting the pressure plate is going to be tricky as it is naturally sprung to push on the clutch disk, meaning I have to collapse it about 1/2" to get it on. When it's new it has a retaining system that holds it until you bolt it up, making it easy to get it on the flywheel. Well, that's gone so this could be tough.
Wednesday, May 5, 2010
A Slightly Lighter Flywheel
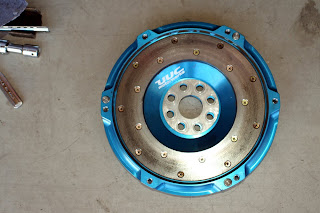
I got the flywheel back this afternoon and it had about 6 grams of material drilled out of the side.

The machine shop was able to get it down to only 0.2 grams out of balance. That's like a smear of grease. Anyway, no time to hook it up this evening. I'll put it on tomorrow and report back as to how stable the assembly is.

The machine shop was able to get it down to only 0.2 grams out of balance. That's like a smear of grease. Anyway, no time to hook it up this evening. I'll put it on tomorrow and report back as to how stable the assembly is.
The Flywheel is at the Shop
That sounds like a pass code phrase you'd hear in a bad spy movie. Anyway, the flywheel is in the shop, and they are going to put it on the machine in the next couple days, to test it and balance it.
While I was there the machinist said something that's got me a bit worried. He looked at the flywheel and said that he'd be surprised if it was out of balance because it was a "zero balance" flywheel. He asked what it's bolted to. I explained how the taper-lock hub mounts to the motor and the flywheel to the hub. He asked if there was any chance the hub was out of balance.
The truth is I have no idea if the hub is in balance. I mentioned yesterday that the motor did vibrate a bit once I'd removed the flywheel. Could that have been caused by the hub being out of balance? I just don't know. There was definitely an improvement in balance when I removed the flywheel. That stands to reason that it was part of the problem.
Let's suppose the hub is out of balance. The question becomes would the flywheel being bolted to the assembly exacerbate the small wobble I saw once the flywheel was removed? It stands to reason that if that were the case, having the clutch plate and disk bolted to the assembly would make it even worse. That's not what I saw. There was no appreciable change in wobble between having the clutch plate mounted and not.
If they find the flywheel is balanced and the problem becomes the taper-lock hub, I'm not quite sure what I need to do to get it fixed.
UPDATE: The shop just called to tell me that the flywheel was indeed out of balance. 6 grams to be precise. I should have it back this afternoon and I can mount it up and see what we get. Stay tuned.
Tuesday, May 4, 2010
Motor Pull
Funny, you usually see an entry in and EV blog called "Motor Pull" as one of the first entries. Certainly not one after the proud builder has put only 901 miles on the completed car!
OK, enough grousing. Here's the, once again, empty engine bay.
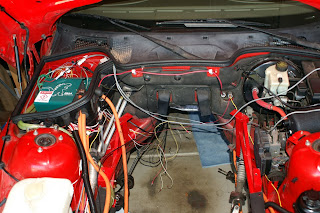 My dad was kind enough to come over and help me get the motor out of the engine bay. It was quick work. I had everything disconnected by 10:30 and we had the motor out 1/2 hour later.
The first order of business was to start testing. We pulled the transmission off of the adaptor plate to expose the clutch and flywheel. I secured the motor and we spun it up. Sure enough, there was the wobble. It took a while for the 12 volt battery to spin it fast enough to see the wobble, but it got us there.
Next, we took off the pressure plate. So only the fly wheel was mounted to the hub. We spun it up again and... wobble. OK, so now we can check off the pressure plate and clutch disk as the cause. Next we removed the flywheel, leaving only the motor and the hub.
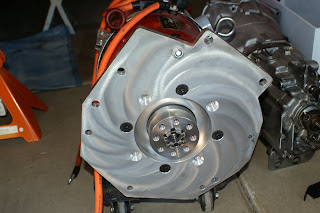
We put the battery on it again and watched carefully. There was still a bit of wobble, but it was substantially less. Perhaps 85 to 90% of the wobble was gone with the flywheel off. So, here's the culprit:
I was kind of surprised to see that there was some wobble with the flywheel off. I did what George from Netgain suggested. I spun it up and looked straight down in the hub. There was no sign of movement at all. I held a piece of aluminum right next to the side of the hub as it spun to see if it rubbed periodically or consistently. There is no variation in the spin at all. Perhaps the slight wobble that we see is from a slight imbalance in the motor. All I know is that it is very minor and there is absolutely no play in the shaft or bearings, so I'm not going to worry about it.
Next I need to get that flywheel down to a shop that can balance it.
OK, enough grousing. Here's the, once again, empty engine bay.
 My dad was kind enough to come over and help me get the motor out of the engine bay. It was quick work. I had everything disconnected by 10:30 and we had the motor out 1/2 hour later.
The first order of business was to start testing. We pulled the transmission off of the adaptor plate to expose the clutch and flywheel. I secured the motor and we spun it up. Sure enough, there was the wobble. It took a while for the 12 volt battery to spin it fast enough to see the wobble, but it got us there.
Next, we took off the pressure plate. So only the fly wheel was mounted to the hub. We spun it up again and... wobble. OK, so now we can check off the pressure plate and clutch disk as the cause. Next we removed the flywheel, leaving only the motor and the hub.

We put the battery on it again and watched carefully. There was still a bit of wobble, but it was substantially less. Perhaps 85 to 90% of the wobble was gone with the flywheel off. So, here's the culprit:

I was kind of surprised to see that there was some wobble with the flywheel off. I did what George from Netgain suggested. I spun it up and looked straight down in the hub. There was no sign of movement at all. I held a piece of aluminum right next to the side of the hub as it spun to see if it rubbed periodically or consistently. There is no variation in the spin at all. Perhaps the slight wobble that we see is from a slight imbalance in the motor. All I know is that it is very minor and there is absolutely no play in the shaft or bearings, so I'm not going to worry about it.
Next I need to get that flywheel down to a shop that can balance it.
Subscribe to:
Posts (Atom)