Last week, the Masterflux A/C system arrived from Revolt Electric, a full 3 weeks ahead of the initial 6 week wait they said I was in for. Fantastic news and time to get cracking on mounting it. I opted for the Sierra Model 06-0982Y3, and the 025F0140-03 controller. The controller can be driven with anything from 120V to 420V DC, and the compressor is capable of putting out over 15,000 BTU. Of course, that's when it operates at over 300 V DC. Since my pack voltage is 160, it will be putting out roughly 10,000 BTU. Should be plenty adequate for a two-seater car that has slightly more cabin space than the inside of a microwave. At full power, it will draw about 6 amps, just shy of 1 kW.
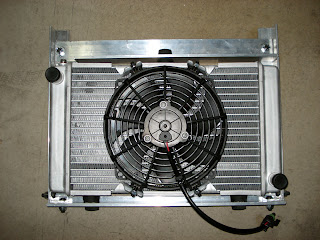
First things first. In order to mount the A/C compressor, I need to know how much room I have to work with. It's going to fit right behind the condenser for the A/C system and the new radiator I'm installing for the Zilla. But before I could measure how much space I needed to build the frame that will hold radiator and then mount it in place. Here's a shot of the radiator in it's frame:
Essentially what I built is a frame made from various angle aluminum stock. The radiator doesn't have any screws or brackets that you can use to mount it to anything. All it has is three pegs meant to hold rubber bushings that would then be pushed into some mounting bracket. Try as I might, I could not find any bushings that would fit the posts. What I did find where rubber stoppers at the local hardware store. I bought three of them and drilled a hole through each. Then I constructed the frame, drilling holes to accept the "bushings" I made and then fastened the whole thing together. It turned out pretty well. The radiator is suspended in that frame via those bushings which provide a little shock absorption for the assembly. It will be suspended from the front battery rack by those two tabs you see sticking out of the top of the rack.
Once that was complete, I put the assembly in place and just clamped it so that I could start figuring out how to position the compressor. I was very worried that I'd have little to know extra room, but as it turns out, I have loads of space. I think there may be as much as a full inch in either direction for me to play with. That may not sound like much, but trust me, that is huge. I've had a difficult time fitting very nearly every component since I started the build, running short by 1/16th of an inch here or there was way to common. Very frustrating.
The A/C compressor will rest in a tray I've made, that will then be suspended from the front battery rack as well. Here is a shot of the tray I made today:
Notice the three large holes in the middle. They are for the rubber feet that hold the compressor, which cushion vibration while it's running. The tray is 1/8" aluminum plate surrounded by 1x1 inch aluminum angle stock. It is light yet remarkably stiff. The compressor weighs about 20 lbs, so it needs to be sturdy.
At this point, I'm very glad I made that rack out of steel. It will end up supporting 12 batteries, the power steering pump, the Zilla's radiator and the A/C compressor. Fortunately it's more than sturdy enough to support all that weight, as are the brackets it mounts to in the car.
My recent experience working with steel and aluminum for all the different support structures that I'm adding is not too dissimilar than my past experience. I've found that building an EV is an endeavor that requires a great deal of care and attention to detail. You decide how and where you're going to mount something, and measure the space. You measure even more carefully, and even build cardboard models. Then you begin cutting the metal you need. Once everything is cut, you start drilling and bolting and/or welding it into it's final shape. You then go back to fit it in the car, and discover that it won't work for some completely unexpected reason. So you scrap the whole thing and start over. Maybe it's just me, but this seems to be an ongoing theme.
Next I get to build the structure that this tray will be suspended from.
On a final note, I did finish installing the new Link-Pro meter in the car. It fit perfectly, replacing the Link-10 effortlessly. I still need to find a new place for that shunt, but I'm not too worried about that.
Subscribe to:
Post Comments (Atom)


2 comments:
The A/C install seems to be going great and it is awesome that you got it ahead of schedule! You are bringing it to the EVCCON right? Will it be ready?
Hi Christopher,
I've been working furiously on the car, but this last week I found myself asking the same question. I've got quite a lot to do yet. I had originally expected to have the car back on the road by mid August, but now I think that's been pushed back to early September.
I hadn't counted on how much of the work I needed to do was dependent upon having the A/C being installed and ready. But once the compressor is in, I think the rest of the items will start to fall like dominoes.
I'd really like to have put the car on the road at least a couple weeks before EVCCON. But to answer your question, I'll be there, and so will the car. Jack has my $5.95 after all, and I can't just let that go to waste!
Post a Comment